

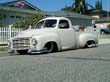
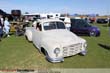
Truck progression
|
||||||
Front progression |
||||||

|

|

|

|
|
||
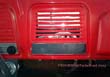
Shaving Begins
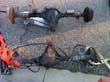
S-10 Frame Camaro Rear end Airbags installed
|
|
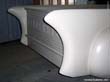
Fresh from the bodyshop
Hood Ornament Shaved Gas Filler Mirrors Shaved |
|
|
||

|

|

|
.jpg)
|
.jpg)
|
||
|
|
|
|
|
||
.jpg)
|

|
.jpg)
|
.jpg)
|

|
||
|
||||||
.jpg)
|
.jpg)
|

|

|
|
||
|
||||||

|

|

|

|
.jpg)
|
||
.jpg)
|

|
.jpg)
|
.jpg)
|

|
||
.jpg)
|
%20Ready%20for%20the%20ride.jpg)
|
%20Back%20at%20home%20cleanup.jpg)
|
.jpg)
|
|||
|
||||||
|
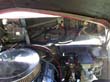
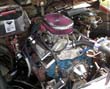
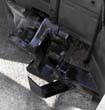
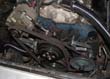
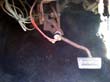
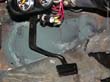
Engine Compartment Progression
|
||||||
.jpg)
|
%20Existing%20Drivers%20front.jpg)
|
%20Existing%20passenger%20side.jpg)
|
%20New%20lines%20and%20fittings%20for%20passenger%20front.jpg)
|
%20New%20fittings%20and%20line%20for%20Driver%20front.jpg)
|
||

|
|
.jpg)
|
.jpg)
|
.jpg)
|
||
|
|
|
||||
|
%20Hood%20latch.jpg)
|
%20Removed%20Cleaned%20and%20Painted.jpg)
|

|

|
||

|
%20Removal%20Begins.jpg)
|
%20Removed%20the%20old%20plate%20for%20modification.jpg)
|
.jpg)
|

|
||

|

|
|

|

|
||

|

|

|
.jpg)
|
.jpg)
|
||

|

|
|
.jpg)
|
.jpg)
|
||
|
|
|||||
.jpg)
|

|
.jpg)
|
.jpg)
|
.jpg)
|
||
|
|
|||||
.jpg)
|
.jpg)
|
.jpg)
|
.jpg)
|

|
||
|
|
|
||||

|

|
.jpg)
|
.jpg)
|
.jpg)
|
||
|
|
|||||
.jpg)
|

|

|
.jpg)
|
.jpg)
|
||
|
||||||
.jpg)
|
.jpg)
|
.jpg)
|
.jpg)
|
.jpg)
|
||
|
|
|
|
|||
.jpg)
|
.jpg)
|
.jpg)
|
.jpg)
|
 |
||
|
|
|||||
.jpg)
|
.jpg)
|
.jpg)
|
.jpg)
|
.jpg)
|
||
|
|
|
||||
.jpg)
|
.jpg)
|
.jpg)
|
.jpg)
|
.jpg)
|
||
|
||||||
.jpg)
|
.jpg)
|
.jpg)
|
%20blast%20hole%20in%20firewall..jpg)
|
%20Layers%20of%20dirt%20removed.jpg)
|
||
%20Damaged%20firewall%20removed.jpg)
|
%20Fitting%20Fill%20panel.jpg)
|
%20Fill%20Panel%20welded%20in%20and%20ground.jpg)
|
.jpg)
|

|
||
|
||||||

|
%20Firewall%20panel%20fitting%20continues.jpg)
|
.jpg)
|
.jpg)
|
.jpg)
|
||
|
||||||
.jpg)
|

|

|

|

|
||
| HD Interstate Battery mounted | ||||||

|

|

|

|

|
||
|
||||||

|

|

|

|
.jpg)
|
||
Interior Progression
tilt steering column Custom interior pieces Big Al's Armrests Big Al's Deluxe Style Door Handles Big Al's Deluxe Style Window handles Lokar Mooneyes Steering wheel Latch seatbelts Underdash gauges for air, gas, oil, temp the rest coming soon |
||||||

|
|

|

|

|
||
|
|
|
||||

|
.jpg)
|

|

|
.jpg)
|
||
.jpg)
|
.jpg)
|
.jpg)
|
.jpg)
|
.jpg)
|
||
|
||||||
.jpg)
|
.jpg)
|
.jpg)
|
.jpg)
|
.jpg)
|
||
.jpg)
|
%20Seat%20Warmer.jpg)
|
%20Using%20the%20old%20as%20a%20pattern.jpg)
|
%20After%20grommet%20for%20wires%20sealer%20around%20the%20plastic.jpg)
|
%20(Large).jpg)
|
||
|
|
|||||
%20(Large).jpg)
|

|

|
|

|
||
|
||||||

|
.jpg)
|
.jpg)
|
.jpg)
|

|
||
 |
|
 |

|

|
||

|

|
|||||
| Chassis / Suspension: Chassis
Frame notch Suspension:
|
||||||

|

|

|
.jpg)
|
.jpg)
|
||
|
|
|
|
|||
.jpg)
|
.jpg)
|
.jpg)
|
|

|
||
%20Bed%20removed%20clean%20up%20and%20new%20work%20begins.jpg)
|
%20Joe%20Vito%20and%20Brad%20installing%20bags%20lines%20and%20finishing%20connections%20after%20new%20mounts.jpg)
|
%20Current%20bag%20setup%20More%20to%20come.jpg)
|
.jpg)
|

|
||
|
||||||
.jpg)
|
.jpg)
|
.jpg)
|
.jpg)
|
.jpg)
|
||
|
||||||
.jpg)
|
.jpg)
|
.jpg)
|
.jpg)
|
.jpg)
|
||
|
|
|||||
 |

|
.jpg)
|
.jpg)
|
.jpg)
|
||
|
|
|||||
.jpg)
|
.jpg)
|
.jpg)
|
.jpg)
|
.jpg)
|
||
.jpg)
|
.jpg)
|
.jpg)
|
.jpg)
|
.jpg) |
||
|
||||||
.jpg)
|
.jpg)
|
.jpg)
|
.jpg)
|
.jpg)
|
||
.jpg)
|
.jpg)
|
.jpg)
|
.jpg)
|
.jpg)
|
||
|
||||||
.jpg)
|
.jpg)
|
.jpg)
|
.jpg)
|
.jpg)
|
||
.jpg)
|
.jpg)
|
.jpg)
|
.jpg)
|
.jpg)
|
||
|
||||||
.jpg)
|
.jpg)
|
.jpg)
|
.jpg)
|
.jpg)
|
||
.jpg)
|
.jpg)
|
.jpg)
|
.jpg)
|
.jpg)
|
||
|
||||||
.jpg)
|
.jpg)
|
.jpg)
|
.jpg) |
.jpg) |
||
|
|
|
||||
.jpg)
|
.jpg)
|
.jpg) |
.jpg) |
.jpg) |
||
|
|
|
||||
.jpg)
|
.jpg)
|
.jpg)
|
.jpg)
|
.jpg)
|
||
|
|
|
||||
.jpg) |
||||||
Rear progression |
||||||

|
|
%20Before.jpg) |
%20Rear%20lights%20Lit%20Up.jpg) |
 |
||
|
|
|
|
|
||
%20Way%20up%20high%20in%20the%20rollie%20pollie%20sky.jpg) |
.jpg) |
 |
.jpg) |
.jpg) |
||
|
|
|
|
|
||
.jpg) |
.jpg) |
|||||
|
||||||
|
Owner: Jim Email: Webmaster@artofnoize.com |
||
|
Special
Thanks to the shops and companies helping to finish
this project |
||
 Can't
Thank Marc at StraightEdge Garage enough for having
this project and allowing me to take it off his
hands Can't
Thank Marc at StraightEdge Garage enough for having
this project and allowing me to take it off his
hands |
Suspension fabrication and installation, full use of
the shop, All
Switch box wiring, switches, Airline and Fittings
provided by Brad at
|
|
|
|
Paul Curry Machining |
Custom machining |
|
|
|
Sponsorship acquisition |
 New
media promotion and sponsor contact assistance New
media promotion and sponsor contact assistance |
|
|

_small1.jpg)


